
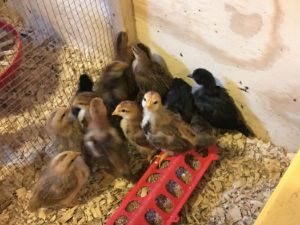
 Anyone who has been to the farm store this time of year knows it’s chick season. The stores will have big galvanized tubs full of chicks and ducklings on display, and some, frustratingly, will fail to ensure that people and/or children don’t handle those chicks (which can result in dropped and injured chicks).
As we described in yesterday’s post, we got our first chicks last spring (late April). Despite trying to prepare by researching before we got them, we still learned a lot through hands-on experience, and we’d like to share those lessons learned in case you decide to get some chicks so you can avoid making the same mistakes we did.
A Few Tips For Bringing Your First Chicks Home
- Buy your chick supplies before you get the chicks; otherwise, you’ll end up buying everything at the store where you buy the chicks, and don’t think they’re not counting on that!
- Have your brooder ready before you bring those chicks home. A big galvanized metal waterer like the ones the farm stores use works well – we bought a 110 gallon recycled rubber tub. Get a larger one than you think you’ll need. Use large pine shavings for litter in the bottom, not fine flakes – this is important for the chicks’ health. Also, plan for a “grow out” brooder or pen because those tiny chicks will grow like weeds and will quickly outgrow that first brooder. And they may fly right out!
- Consider buying a brooder plate instead of using a brooder lamp. While the plate will initially be more expensive than the lamp, it doesn’t pose the same risk of fire as the lamp, uses less power, and is arguably better for the chicks (no artificial, constantly-on red light that they can’t really get away from). This season’s chicks have thrived with the brooder plate, and we use it for a shorter period than we did the lamp.
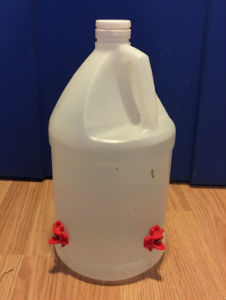 Use an automatic waterer for maybe the first day or two, then transition the chicks to nipple waterers. Every single automatic waterer we purchased over the last year leaked and wreaked havoc in our wood brooder. We first transitioned to the vertical nipple waterers, which can be found in most farm and pet stores and online. The vertical nipple waterers also leaked, but not as much as the standard automatic waterers. We then switched to a horizontal nipple waterer, which is definitely the winner. Leaks in the brooder are bad news. Avoid them. If you do have a leak, remove the wet shavings right away so mold won’t grow. We had to replace the entire bottom of our brooder last year due to a 3-gallon automatic waterer that leaked its entire contents out into the brooder, allowing moisture to get trapped on the bottom, leading to mold growth. Gross…and expensive to fix.
- Plan to get the feeder off the ground ASAP, too. A standard chick feeder is ok for the first couple of days, but soon, they’ll scratch lots of shavings into it and poop in it enthusiastically. Unless you don’t mind cleaning it out several times a day, move to a hanging poultry feeder. You’ll be glad you did.
- Boost the chicks’ immune systems with probiotics by adding a splash of raw vinegar to their water. Many people use raw Apple Cider Vinegar (ACV) – we use Kombucha Tea vinegar. It’s critical that you (1) only use raw vinegar (not distilled white vinegar) and (2) only add it when you’re using a plastic waterer – vinegar can corrode metal, so don’t use with galvanized metal or even stainless steel watering nipples.
- Pick your own chicks out. Yes, with straight run non sex-linked chicks you could potentially choose all roosters, but choosing your own allows you to look at them carefully so you only select healthy, active-looking ones. If they don’t allow you to handle the chicks yourself, insist on pointing out the ones you want them to catch. Last year, the farm store employee who pulled the chicks for us gave us one that turned out to have a really bad pasty butt problem and it died in the first week. If we were re-doing the selection now, we would know that the chick was not healthy because it was easily caught and cheeped incessantly. That is not normal.
- Keep learning about raising chickens. Whether you buy chicken-raising books or use information-rich online resources, read up on raising chicks and how to deal with problems before they happen. Local county extension offices will likely also offer “raising chickens 101”-type classes and will cover the basics, including housing for adult flocks (that’s another post!) and dealing with predators. Avail yourself of these resources so you can be the best chicken keeper you can be.
A word about chick food: chicks should be fed chick starter, not layer feed. This is critical. Chick starter is specifically formulated for the needs of growing chicks, and they don’t need the extra calcium present in layer feed. In chick feed, both medicated and non-medicated versions are available. We prefer the non-medicated, wanting our animals to naturally develop strong immune systems. We buy non-GMO, non-medicated chick starter from a local feed mill and the chicks have done well on it. If non-GMO isn’t available in your area, consider buying organic chick starter. Most of the soy used in chick starter is genetically modified, as is the corn, so if it doesn’t say “non-GMO”, it’s highly likely it’s genetically modified. If your chicks go outside, such as on pasture, you should also supply chick grit so they can “chew” up grass, etc. they may be eating outside in their gizzards. Chick grit is a finer, smaller consistency (like grains of sand) than adult chicken grit, which is more like small gravel in consistency.
We hope your first chick experience is as exciting, entertaining, and rewarding as ours was. We eat farm fresh eggs from those first chicks (now adults) daily, and we think they’re the best eggs ever. Happy chicken keeping!